Getting a new client always starts innocently enough. Initial talks go well. Everyone’s on board. But then you get full account access and start digging deeper…
True story: I once worked with a client who was spending tens of thousands each month on PPC. Yet they had zero conversion tracking.
The phone rang, sure. But no one knew why. Everyone just assumed it was… ? Billboards? (Let’s not be ridiculous, here.)

“But I have an AdWords call extension,” you claim. “I AM tracking phone calls with events,” you say.
That’s great. A good start. But not nearly enough. Here’s why.
Problem #1: How often do you call a new company directly from an AdWords ad?
Or do you act like a rational human being and click through the ad to the website or landing page to check them out first? That way, you can see if they’re legit or not before picking up the phone to dial. But what happens with your AdWords call extension in this case?
That’s right. You get nothing.

Problem #2: Last touch attribution bias.
AdWords drove the call, but you have no idea which steps before helped to “assist” the conversion. You can’t measure the proper attribution.
Problem #3: You’re only able to see aggregate data.
Let’s suspend disbelief for a second and say someone called you without ever leaving the SERPs, deciding to hand over their credit card to a complete stranger because you just sounded so nice on the phone…
You can still only see aggregate data.
Calls aren’t customers. They’re just calls.
Maybe the prospect’s lost and needs directions. Maybe they want the hours of your location. Maybe the stars aligned and they did become a lead.
Now, all hope is not lost. There is a solution. A way out of this mess. You just need the right tool for the right job.
Enter CallRail.
How to reclaim the phone calls you so rightfully deserve
CallRail can do a few awesome things that will make many of the aforementioned problems go away.
The gold lies in their dynamic keywords pool feature.
Let’s replay the scenario from earlier to see how it works. Someone Googles you, clicks through to a landing page, and possibly might even bounce back to your homepage to find out more about you first.
In the old days, you’d be SOL.
With CallRail’s number insertion, though, your tracking phone number will follow that person from page to page throughout their sessions.
Once someone does call in, you get a wealth of data including the pages they visited during this session, their physical location, and of course, the specific ad or keyword they clicked on in the first place.
The insight will be neatly compiled inside a dashboard for that individual call:

And you know what’s even more glorious?
You can automagically pass this data back to your CRM to track subsequent calls and/or real, honest-to-goodness conversions. (Assuming, of course, that you’re not using a precious “industry specialized” piece of software that doesn’t allow you to do anything with anything.)
Call data now gets passed back and forth. You can even merge it with existing lead data. So you’re not just tracking phone leads anymore, but real dolla dolla billz y’all. #closedloopforthewin

Sounds great, right?
Here’s how to set it up on your campaigns.
Step 1: Start by creating a dynamic keyword pool in CallRail
Log into the CallRail dashboard and head to the Numbers section (denoted with a pound sign):

Next, look for the little button that says, “+ Add a Phone Number”:

After clicking, you’ll get the option to use it online or off (so you can track calls from account-based marketing campaigns for example):
Next, you’ll want to add it to your website.
And then track each individual visitor (as opposed to the campaign).
This way you’ll set up a “pool” of phone numbers that will automatically tie and rotate for each individual website visitor (as opposed to tracking by page).
So let’s now set up that pool.
Go ahead and name the pool whatever you’d like.
The “Destination Number” is the business line your company uses that you want to ultimately ring. We can also edit this later with a “Swap Target.”
Your pool size should depend on how much real-time traffic you get to your site. Generally speaking, you’ll need smaller pool sizes on low traffic sites and larger pool sizes on higher traffic sites.
I believe CallRail’s recommendation is (or was) to look at the number of real-time visitors you’re getting to your site at its peak to gauge the ultimate pool number you might need at any one time.
Next, select which traffic sources you’d like this number pool to track (just default to “All”).
Then you can select a specific area code (toll-free vs. local) you want to use on your website.
Finally, select whether you want to record calls and add a “whisper message.”
The whisper message is exactly what it sounds like.
When someone calls from your landing page, the person answering the phone at your business will hear a soft whisper message before the call connects. For example, you can set it to say “holiday sale promotion” to alert the person answering the phone to the source of the call.
This can be very helpful to know exactly how to service the customer without asking how they got to you.
(Recording calls is also free FYI.)
Easy enough, right?!
Perfect. Now let’s move on to the next step.

Step 2: Set up your landing page
We created our first dynamic keyword pool in the last step. Now we want to install the script onto our Unbounce landing pages and set up your phone number swap targets.
There are two ways to do it, so let’s start with the lazy easy solution of pointing and clicking with the official integration.
Go into Unbounce and find the company you’d like to integrate with CallRail.

Next, click on the “Settings” gear icon:
Now select the “Integrations” tab inside CallRail (under “Settings”).

And click “Activate” on the Unbounce option.

You’ll then be whisked away to Unbounce to Authorize the connection.
You can also install the tracking script manually on each landing page if you’d rather not connect at the company level.
First, head over to the “Settings” gear icon and click on “Integrations” to find “Dynamic Number Insertion.”

Then scroll down and you’ll find the tracking JavaScript:
All you’ll need to do is copy and paste this before the closing body tag (</body>) on the pages containing your phone number.
Look for “JavaScripts” down at the bottom of your landing page builder inside Unbounce:

Then paste in your code and select the correct placement (“Before Body End Tag”).

Obviously, save your work — and you’re done. Easy peasy.
Now let’s go update any swap target details on these landing pages.
Head back into CallRail and go to the “Numbers” section again.

Now, select the number pool you just created in the last step by clicking on the little edit pencil icon:
Then, scroll down to point three (“Dynamic Number Insertion”) to add the Swap Target and edit the Pool Size (if needed).

The Swap Target is the phone number you want CallRail to look for on your website and dynamically change it with ones from your keyword pool.
So if you have 123-456-7899 as your company number, you would place that as the swap target so that CallRail can populate new tracking numbers for each visitor.
(You can also add a secondary Swap Target if you have multiple different phone numbers on the page.)
Step 3: Integrate CallRail with AdWords
You’ve already done a lot of work. Nice job! Any calls from “organic” sources of traffic should now be tracked inside CallRail.
However, the entire point of this exercise was to demystify your PPC traffic, so let’s connect CallRail with your AdWords account.
Inside CallRail, go to “Settings,” “Integrations,” and then click on “Google AdWords.”
Once there, click the “Authorize” button at the bottom of the page.

Now “Allow” with your Google account.

Then choose the company you want to integrate with CallRail.

Hit “Activate” and you should be good to go.
Before moving on, though, let’s add keyword-level tracking.
Adding keyword-level tracking
Adding the ?keyword={keyword} parameter to your URLs in AdWords is the last recommended step. Adding this parameter to your ad URLs will make sure individual keyword data displays on your call log and in caller’s timelines (inside CallRail).
Head to your “Shared Library” at the bottom of your AdWords account.

Then head over to the URL options in the bottom right-hand corner.

Here, you have two options:

- You can add a tracking template, and
- You can set up auto tracking
Here’s how to manually add the tracking data.
Type “{lpurl}” and add the keyword parameter. In this case, {lpurl} represents your final URL, so you won’t have to manually enter your ad URLs.
If your tracking template does not contain a “?” append: “?keyword={keyword}” like so:
Then, hit test and wait for the green light.
Once you’re done, you will start to see keyword data from AdWords inside CallRail.
Hooray! 🎉
Step 4: Add call goals to Google Analytics
If we’re being prudent, there should also be a conversion goal inside Google Analytics.
Your data will never truly be 100%, 100% of the time. There will be flaws. There will be gaps. There will be misalignment.
Triangulating data points from several different sources helps you handicap this risk.
That means we also want to integrate CallRail with Google Analytics while we’re at it. To do so, head to “Settings,” “Integrations,” and “Google Analytics.”
When there, drop in your Google Analytics ID and hit “Update.”

Next, head to Google Analytics to create a new call goal.
Go to “Admin” (the gear icon in the lower left-hand corner), then “View” and finally “Goals” in the upper-right corner:
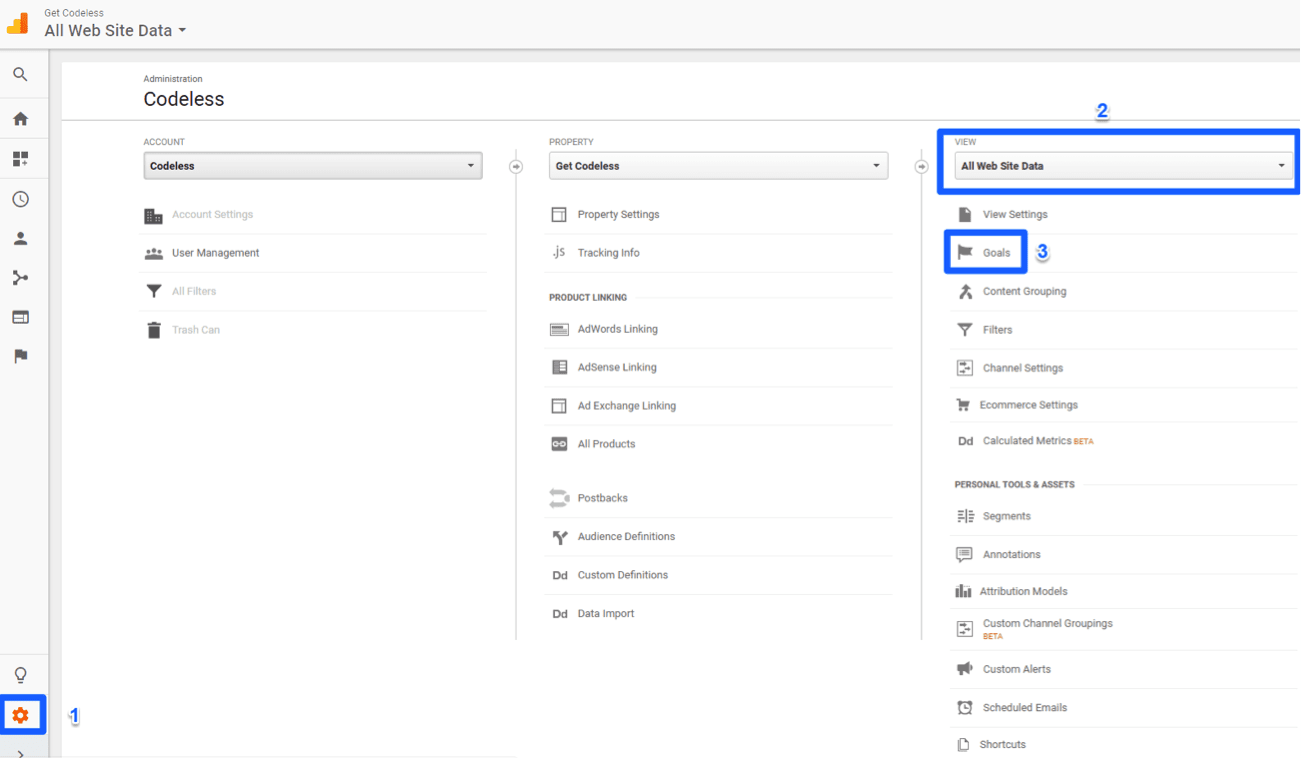
Now select the bright red “+ New Goal” button.

Once inside, click on “Custom” down below because we’re about to get a little fancy.

Enter the name and select event.

Now we need to customize the event conditions to make sure your data will be labelled properly.
So drop “Phone” into the Category option.

And “Save” the new goal!
Step 5: Integrate CallRail with your CRM (like HubSpot) for full-funnel Attribution
Wouldn’t it be nice if you could now see which phone calls resulted in closed deals paying you the big bucks?
After all, you should be making strategic PPC decisions based on meaningful data (revenue, Cost Per Lead, etc.) and not just vanity metrics (new leads, Cost Per Click, etc.).
The good news is that you can with CallRail.
Head back into “Settings” and “Integrations”, then look for your favorite CRM.

We’ll use “HubSpot” in this example to show you how these integrations work.
Scroll down to HubSpot and hit the “Activate” button.

Then you’ll need to grab your HubSpot ID to finalize this integration.

So head to HubSpot, log in, and grab the “Hub ID” in the top right-hand corner of your screen.
Simply copy that number and head back to the CallRail HubSpot Integration screen, paste it in, and hit “Authorize.”

You can also select to create a new lead inside HubSpot each time someone calls. You won’t have their name and email at this point necessarily, but you can merge it on subsequent calls.
Next, HubSpot will ask you to select the account to link CallRail with and then “Grant access.”

And that’s it! Now, your calls will create new leads in HubSpot and integrate the data.
Step 6: Measuring campaign performance back to ad spend
Now you’ve completed all the hard work.
The only thing that’s left is to actually use the data once it starts rolling in.
When you log into CallRail, the dashboard right in front of you will list out some of the most recent activity.

Let’s break down this down (by number):
- This is your Keyword Pool name for each call
- The campaign keywords from that drove each click and then call (if there’s nothing showing up, it’s most likely organic as opposed to a PPC call)
- The specific campaigns (pulling in PPC data) that drove each click and call
- Your landing page where the call initiated
- And finally the Lead Status for each (so you can record the number of good, quality leads vs. the junk)
Why is this useful?
Now this data will help you figure out:
- Which keywords are performing well and driving calls.
- Which campaigns are performing well and driving calls.
- Which landing pages are performing well and driving calls.
- And where the F*@#$%$ your customers are actually coming from!!!
You can now also view some of this data inside AdWords, too.
Go under “Tools” and look for “Conversions.”

Then you can now see AdWords phone calls ready to track through the CallRail integration we set up earlier.

And because we dot all i’s and cross all t’s, you can see this data inside Google Analytics now, too.
Log in and head over to “Behavior,” then “Events,” and finally “Top Events.”

Here you will see the phone call goal you created earlier in this article. If you click on that phone text link, you can see even deeper data:
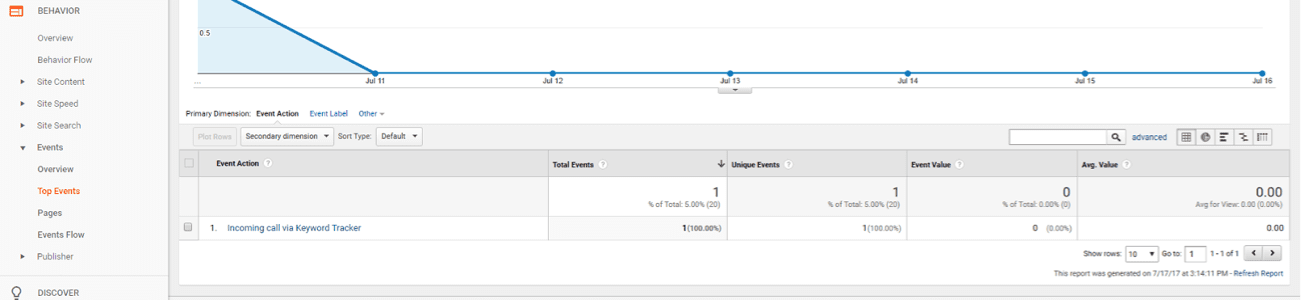
The reporting format varies based on whether the call was received via a source tracking number or a keyword tracking number with the following attributes:
- Source Tracker: Incoming call via [tracking number] – [source name]
- Keyword Tracker: Incoming call via Keyword Tracker
Next, in the event action table, you can click on each action for more details.
Like the phone number that just called you.

And that’s it!
Phew, we made it.
Thanks for sticking around to the end. I think you deserve the rest of the day off.

Before I say goodbye…
Phone calls produce the best conversion rates of any sales channel. They eclipse lead gen data from your standard website form fill.
Phone calls from AdWords are especially lucrative because these people are often already at the bottom of the funnel; they’re ready to take action and sign up or get started immediately.
But if you’re not tracking any of them, you can’t determine which campaigns, individual landing pages, or keywords are driving the best ROI (and not just lead counts).
Thankfully, there’s CallRail + Unbounce. A match made in PPC heaven.
You can run through the steps listed in this article, finally close the phone call loop, and reclaim those conversions that are so rightfully yours — because you can’t take credit for conversions if you don’t know where they came from.

