
I’d guess that over half of the e-commerce stores I visit use entrance popups to advertise their current deal. Most often it’s a discount.
What is an Entrance Popup and What’s Wrong With Them?
They are as they sound. A popup that appears as soon as you arrive on the site. They’re definitely the most interruptive of all popups because you’ve not even had a chance to look around.
I get why they are used though because they work really well at one thing – letting you know that an offer exists, and what it is. And given high levels of competition for online dollars, it makes sense why they would be so prolific.
The intrusion isn’t the only point of frustration. There’s also the scenario where you arrive on a site, see an offer appear, you find it interesting and potentially very valuable (who doesn’t want 50% off?), but you want to do some actual looking around – the shopping part – before thinking about the offer. And when you’re forced to close the popup in order to continue, it’s frustrating because you want the offer! You just don’t want it right now.
So, given the fact that they are so common, and they’re not going anywhere anytime soon, and they create these points of frustration, I’ve been working on developing a few alternative ways to solve the same problem.
The one I want to share with you today is called “Maybe Later”.
“Maybe Later” is a Solution to Increase Engagement and Reduce Frustration
As you saw in the header image, instead of the now classic YES/NO popup – the one that gets abused by shady marketers (Technology isn’t the Problem, We Are.) – “Maybe Later” includes a third option called, you guessed it!
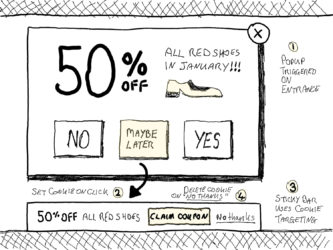
It’s more than just a third button, here’s how it works (I’ll refer to the sketch opposite):
- The popup appears when you enter the site. You can choose “No” to get rid of it, “Yes” to take advantage of it, or “Maybe Later” to register your interest but get it out of your way.
- When you click “Maybe Later” a cookie is set to log your interest.
- Now while you are browsing the rest of the site, a Sticky Bar – targeted at the cookie that was set – appears at the bottom (or top) of the page, with a more subtle reminder of the offer, so that you know it there and ready if you decide to take advantage of it.
- If you decide against the offer, you can click “No thanks” on the Sticky Bar, the cookie is deleted, and the offer is hidden for good.
The core purpose of this idea is to put the control back with the shopper while creating an effective method for the retailer to engage with you, with your permission.
Follow our Product Awareness Month journey >> click here to launch a popup with a subscribe form (it uses our on-click trigger feature).
Visual Hierarchy on Popup Buttons
When you have more than a single button, it’s important to establish visual design cues to indicate how the hierarchical dominance plays out. For you as a marketer, the most important of the three buttons is YES, MAYBE LATER is second, and NO is the least.
You can create a better user experience for your visitors by using the correct visual hierarchy and affordance when it comes to button design. In the image below, there is a progression of visual dominance from left to right (which is the correct direction – in Western society). Left is considered a backward step (in online interaction design terms), and right is a progression to the goal.

From left to right we see:
- The NO button: is designed as a ghost button which has the least affordance and weight of the three.
- The MAYBE LATER button: gains some solidity by increasing the opacity
- The YES button: has a fully opaque design represented by the primary call to action colour of the theme.
You can achieve a similar level of dominance by making the secondary action a link instead of a button, which is a great visual hierarchy design technique. What I don’t like is when people do this, but they make the “No thanks” link really tiny. If you’re going to provide an option, do it with a little dignity and make it easy to see and click.
See the “Maybe Later” Popup-to-Sticky-Bar Model in Action
Alrighty, demo time! I have a few instructions for you to follow to see it in action. I didn’t load the popup on this page as it’s supposed to be an entrance popup and I needed to set the scene first. But I’ll use some trickery to make it happen for you.
Follow these instructions and you’ll see “Maybe Later” in action:
Please note: this is desktop only right now, but I’ll set up the mobile version soon.
- Visit this page (opens in new window).
- Click the “Maybe Later” button and the popup will close.
- Refresh that page and you’ll see a Sticky Bar with the same offer appear at the bottom.
- Come back to this page.
- Refresh this page and you’ll see the Sticky Bar here too.
- Click “No thanks” to get rid of it when you’ve had enough :D
Here’s the entrance Popup you will see:

And the Sticky Bar you will see following that:

How to Use “Maybe Later” on Your Website
If you’d like to give it a try, follow the instructions below in your Unbounce account. (You should sign up for Unbounce if you haven’t already: you get Landing Pages, Popups, and Sticky Bars all in the same builder).
You can also see what Popups and Sticky Bars look like on your website by entering your URL on our new Live Preview Tool.
“Maybe Later” Setup Instructions
Caveat: This is not an official Unbounce feature, and as such is not technically supported. But it is damn cool. And if enough people scream really hard, maybe I’ll be able to persuade the product team to add it to the list. And please talk to a developer before trying this in a production environment.
I must also give a shout out to Unbounce developer Brian Burns who wrote the code that makes the communication between Popup, Sticky Bar, and the host page possible.
Step 1: Create a Popup in Unbounce
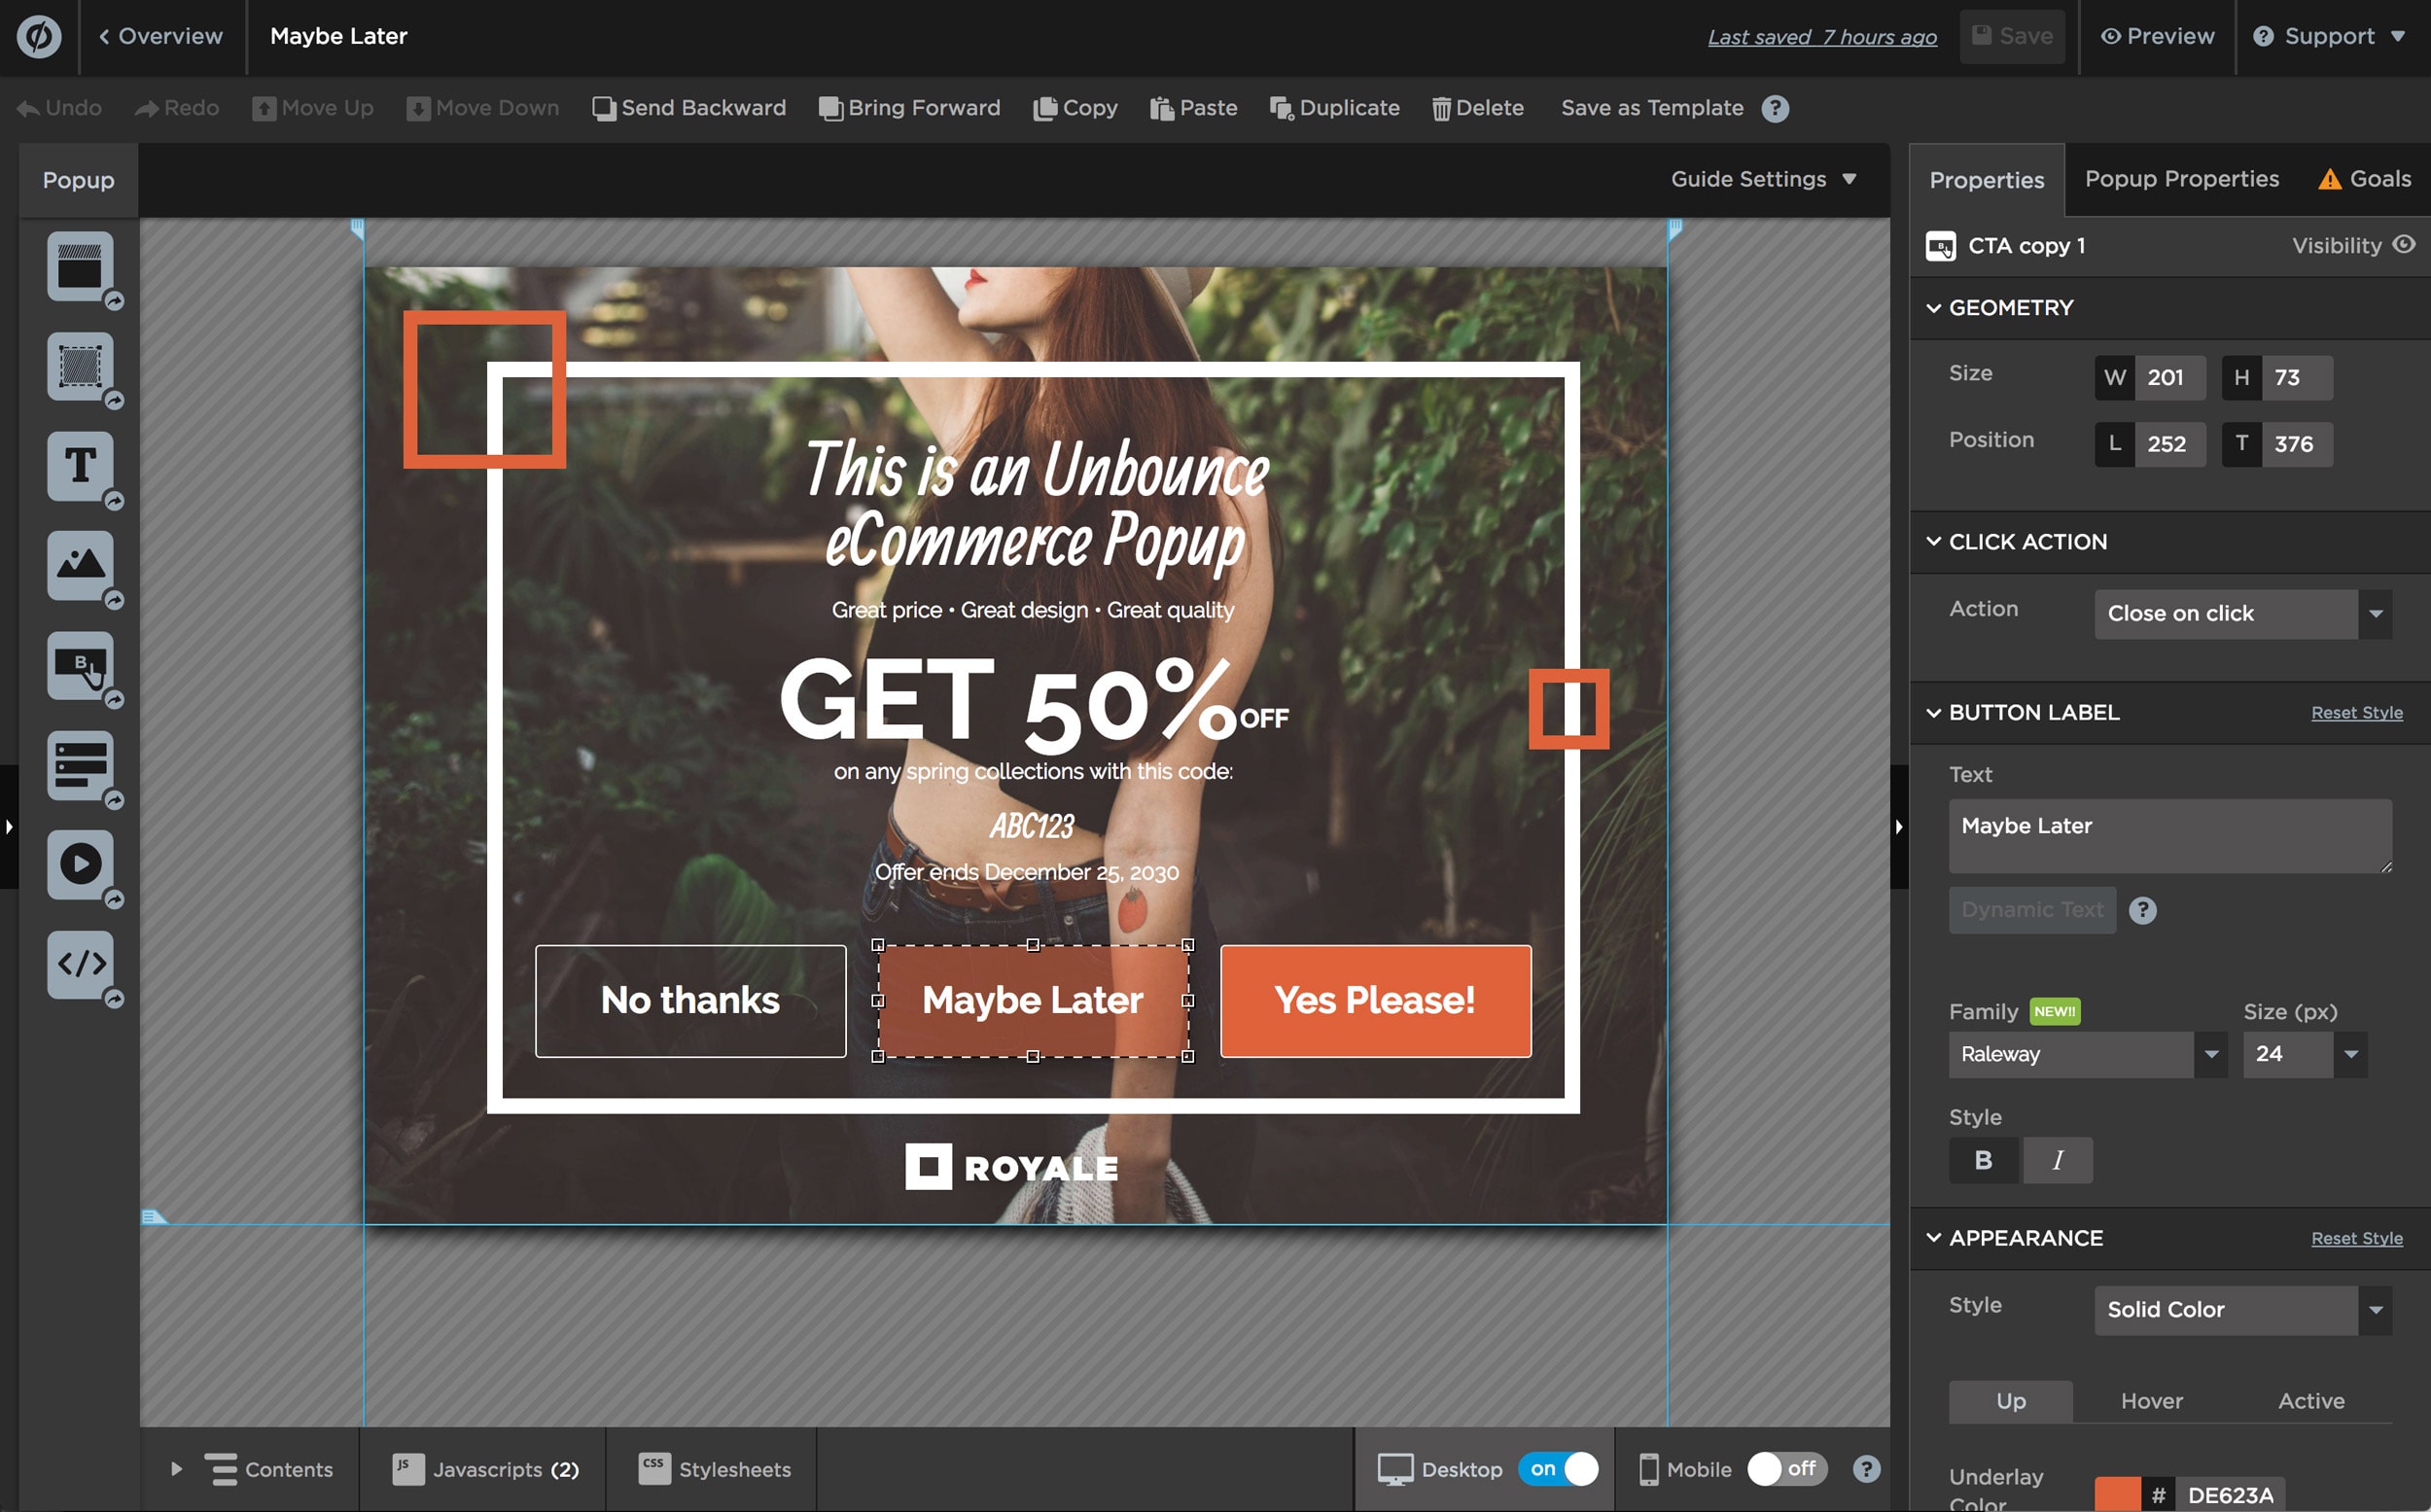
Step 2: Add “Maybe Later” Script to the Popup
In the “Javascripts” window located in the bottom-left.

Add the following script “Before the body end tag”, replacing “lp-pom-button-50” with the id of your “Maybe Later” button, and unbounce.com with your own domain.
document.getElementById("lp-pom-button-50").onclick = function() {
parent.postMessage(JSON.stringify('later'), 'https://unbounce.com');
}
Step 3: Set URL Targeting on Popup
Set up the URL targeting for where you want the popup to appear. I chose the post you’re reading right now (with a ?demo extension so it would only fire when I sent you to that URL).

Step 4: Set Cookie Targeting on Popup
Set up the cookie targeting to “Not show” when the “Maybe Later” cookie is present. The cookie is set when the button is clicked. (You’ll see how in step 9).

Step 5: Create a Sticky Bar in Unbounce

Step 6: Add “Maybe Later” Script to the Sticky Bar
Add the following script “Before the body end tag”, replacing “lp-pom-button-45” with the id of your “No Thanks” button, and unbounce.com with your own domain.
document.getElementById("lp-pom-button-45").onclick = function() {
parent.postMessage(JSON.stringify('laterForget'), 'https://unbounce.com');
}
Step 7: Set URL Targeting on Sticky Bar
Set up the URL targeting for where you want the Sticky Bar to appear. This might be every page on your e-commerce site, or in my case just this post and another for testing.

Step 8: Set Cookie Targeting on Sticky Bar
Set the Trigger to “Arrival”, Frequency to “Every Visit”, and Cookie Targeting to show when the cookie we’re using is set. (You’ll see how it’s set in the next step).

Step 9: Add “Maybe Later” Code to Your Website
This is some code that allows the Popup and Sticky Bar to “talk” to its host page and set/delete the cookie.
// On receiving message from the popup set a cookie
window.onload = function() {
function receiveMessage(e) {
var eventData = JSON.parse(e.data);
// Check for the later message
if (eventData === 'later') {
document.cookie = "mlshowSticky=true; expires=Thu, 11 May 2019 12:00:00 UTC; path=/";
}
if (eventData === 'laterForget') {
document.cookie = "mlshowSticky=; expires=Thu, 01 Jan 1970 00:00:00 UTC; path=/;";
}
}
// Listen for the message from the host page
window.addEventListener('message', receiveMessage);
}
Step 10: Enjoy Being Awesome
That’s all, folks!
What Do You Think?
I’d love to know what you think about this idea in the comments, so please jump in with your thoughts and ideas.
Later (maybe),
Oli
p.s. Don’t forget to see what Popups and Sticky Bars look like on your website with the new Live Preview Tool


