We all know marketing campaigns convert best when we segment and personalize them – which is where geo-targeting can come into play. In fact, a whopping 74% of consumers get frustrated on sites where the content has nothing to do with their interests, and 86% of customers say personalization impacts their purchase decisions.
The good news is, today you can tailor almost every marketing experience to a visitor’s location and other identifiers to make offers feel more personal. So why do even the best of us continue to use blanket-style, default messaging for every visitor?
More than half of marketers struggle to execute personalized campaigns, and reasons range from not having enough data about TOFU prospects to know what to personalize—to having trouble securing the resources to execute.
But making sure everyone sees relevant, location-based offers on your website doesn’t actually need to be a huge production. In our experience, it’s way easier (and could do more for your conversion rates) than you might think.
Why geo-target website content — and the fastest way to try this
Like all forms of personalization, geo-targeting is about relevance. And I should clarify off the bat, I’m not talking about using “y’all” in your headline if you’re targeting Texans, or splitting hairs on “sneakers” vs. “tennis shoes” based on regional preference.
What I am talking about is getting way more creative and specific with your offers. If visitors see offers that feel like they’re just for them, they’re more likely to click through, and convert.
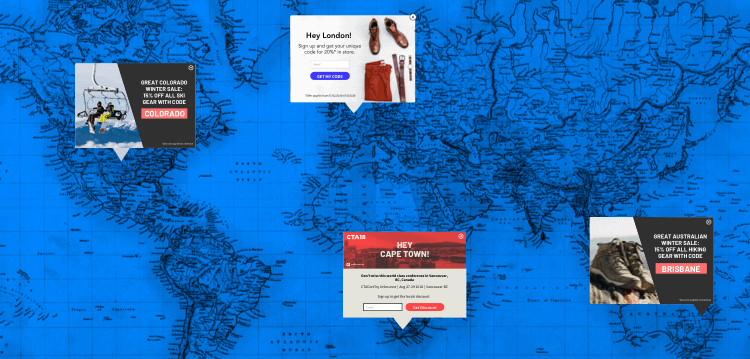
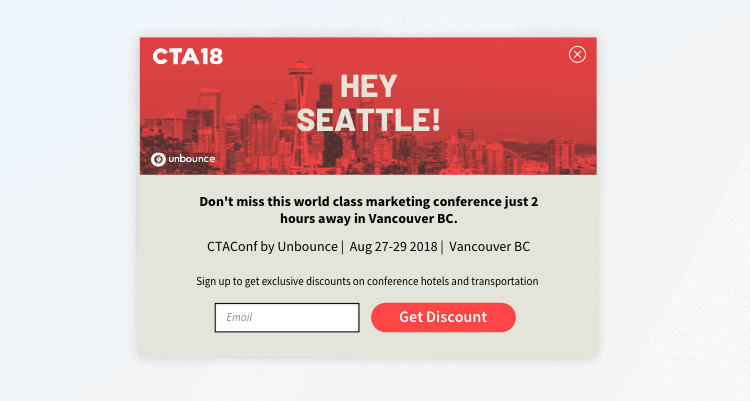
For example, imagine targeting only locals in Chicago, Philadelphia, and Seattle respectively with their own coupon codes and special hotel offers for your in-person event instead of blanketing your entire site with a generic message.
Now imagine if you didn’t need to rely on your web team to get those three offers up on the site and could do it yourself really fast?
One of the quickest ways to experiment with this type of personalization is website popups and sticky bars. The real key with these is understanding your options (and there are plenty of them!). Here are a few of my favourite examples to get you started:
Practical geo-targeting examples to try today
According to Steve Olenski of Forbes, “acknowledging [your] potential buyer’s location increases relevance, and the result is higher engagement that can translate into additional revenue.” It’s a quick win! And, with ecommerce in particular, there’s tons of opportunity to run promotions suited to specific locations.
As an example, if you sell sports equipment or apparel, you could run two or more different “winter sales” suited to the context of winter in different locations. Your ‘classic’ winter sale would appear in states like Colorado—and could feature an offer for 15% off ski gear, whereas your ‘Californian winter sale’ could showcase 15% off hiking gear.
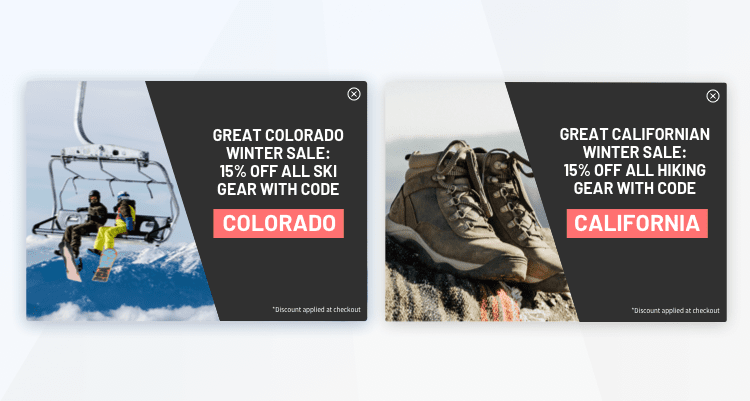
Not only do you earn points by acknowledging your visitor’s location like this, but you also ensure each region sees an offer that makes the most sense for them. Running offers like this is wayyyy better than a single offer that’s less relevant to everyone and later wondering why it didn’t convert.
Recommended settings for this example:
Frequency: Show once per visitor
Trigger: On exit
We’ve all seen the most common ecommerce discount popup on entry. You know the one — “signup for our newsletter for 15% off your first purchase”. And there’s a reason we’ve all seen it: it works. But, we can do better.
To take things a step further, you can target this type of offer by location. If you have physical stores in specific cities, you can offer an in-store discount in exchange for the newsletter sign up. Like this:
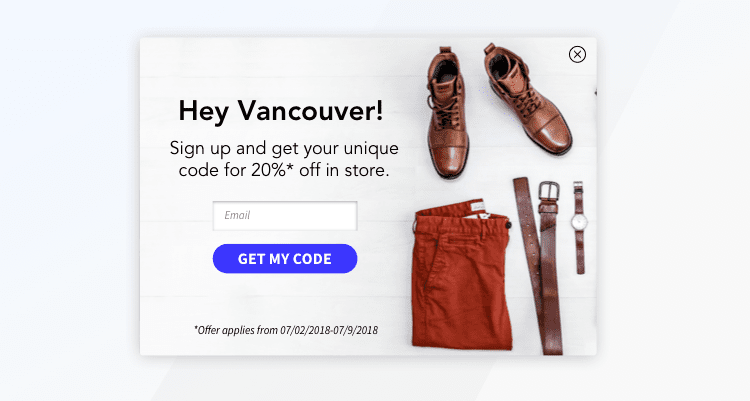
This can help you build foot traffic in different cities, and help you create location-specific mailing lists to promote more relevant in-store events, products, and sales to local shoppers.
Recommended settings for this example:
Frequency: Show once per visitor
Trigger: When a visitor scrolls 40% of the way down your page.
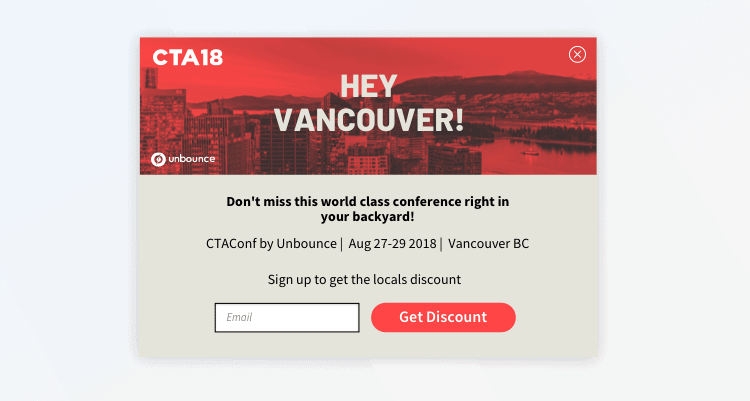
If you’ve ever planned a party, you know how easy it is to fixate on details. Are three kinds of cheese enough? Is my Spotify Discover Weekly cool or do I need a new playlist?! None of this matters if nobody shows up. Marketing events are no different.
A well timed, geo-targeted popup or sticky bar can get your message in front of the people who will care most about your event. When you tailor event messages to your visitor’s location, you can include a more precise value prop. Targeting locals? Remind them how cost effective it is since they don’t have to travel. Targeting neighbors in a nearby state? Remind them that your conference can be a mini-vacation complete with conference-exclusive hotel discounts.
Recommended settings for this example:
Frequency: Show on the first visit
Trigger: Show after a 15-25 second delay on relevant URLs (you can use Google Analytics to determine the right delay for your site).
Hyper-personalize text on your popups
As a bonus: just as you can do with your Unbounce landing pages, you can also swap out text on your popups and sticky bars with Dynamic Text Replacement to match a prospect’s exact search terms.
This gives you a way to maintain perfect relevance between your ads and website popups in this case.
For example, you could choose to switch out the name of a product for a more relevant one in a popup. If someone searched for “House Prices in Portland”, you could automatically swap out the text in your popup to match exactly and maintain hyper relevance. You can read about a real Unbounce customer experimenting with DTR here.
How to create your own geo-targeted popups
On premium plans and above you can target Unbounce popups by country, region, and even city (which is wicked granular!). The possibilities for what you show, or how you show it, are nearly endless:
- You can trigger: on exit, arrival, after a delay, on scroll, or on click.
- And you can target: by location (geo-targeting), URL, referring URL, and cookie targeting.
The options you choose will come down to a few factors including your site, your buyers, ad standards you uphold for a great website experience, and testing.
Here’s how to setup popups and sticky bars on your site:
To get started:
- Hop into your Unbounce account , and on the All Pages Screen, click “Popups & Sticky Bars” in the left menu.
- In the top left, Select “+ Popup or Sticky Bar”.
- Then, click “Create a Popup.”
- Choose a Template (or start with a blank popup if you prefer), name your popup, and select “Start with this Template”.


Once you’ve created your popup, set your targeting, triggering and frequency. On your popup or sticky bar overview page:
- Set the domain and URL paths where you want your popup or sticky bar to appear.
- Choose your triggering option based on your engagement goals.
- Set your frequency to choose how often your visitors will see your popup or sticky bar.
- In the advanced triggers section, toggle location targeting on and choose which country, region or city you want to show (or not show) your popup or sticky bar.


For best results, personalize
As I hope I’ve illustrated, in the golden age of martech, it’s time to stop squandering valuable website visits on impersonal, generic experiences. You can now leverage useful information about where your visitors are coming from and, by extension, come up with creative offers that will be relevant for them. Small details significantly enhance customer experience, and I hope you can use the above three examples as a springboard for some experiments of your own.

