
If you’ve read Unbounce’s 2019 Page Speed Report (and you really should), then you already know why speed is so important this year. Slow-loading landing pages have always been an obstacle to higher conversions, and now Google is punishing poor mobile load times in its search rankings. To be successful in 2019, we—marketers—need to be thinking fast. But are we?
To find out, we polled almost 400 marketers on their attitudes around page speed and asked what (if anything) they were doing to get faster.
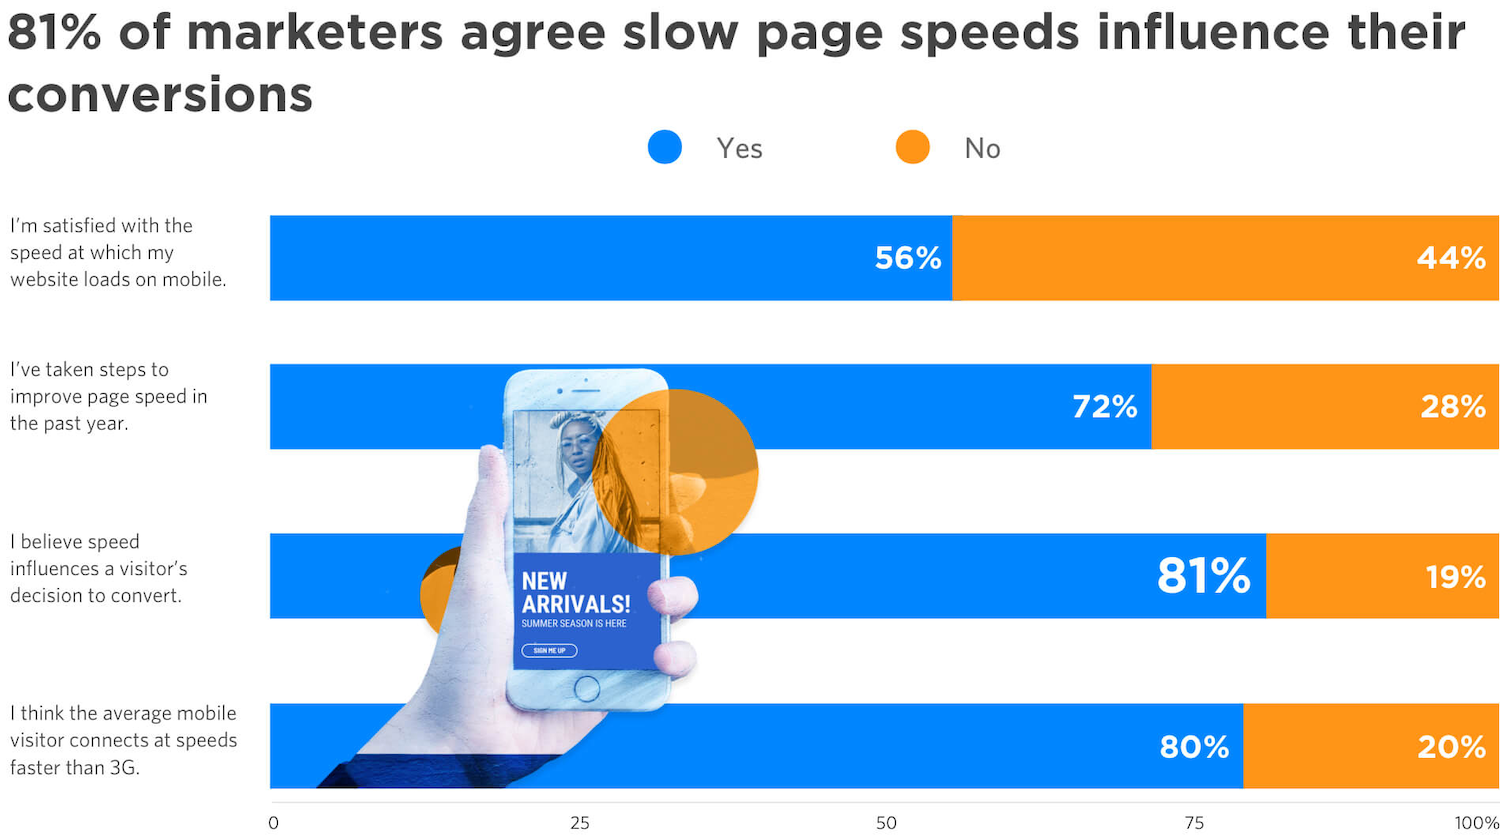
Almost three of every four respondents said they had taken steps to improve their page speeds over the last year, and that’s pretty good. Alarmingly, though, only half of marketers we surveyed are satisfied with their load times on mobile.
So most marketers are trying to get faster, but many aren’t where they want to be. Which begs the question: what are people doing to speed up their landing page load times?
Computer, enhance!
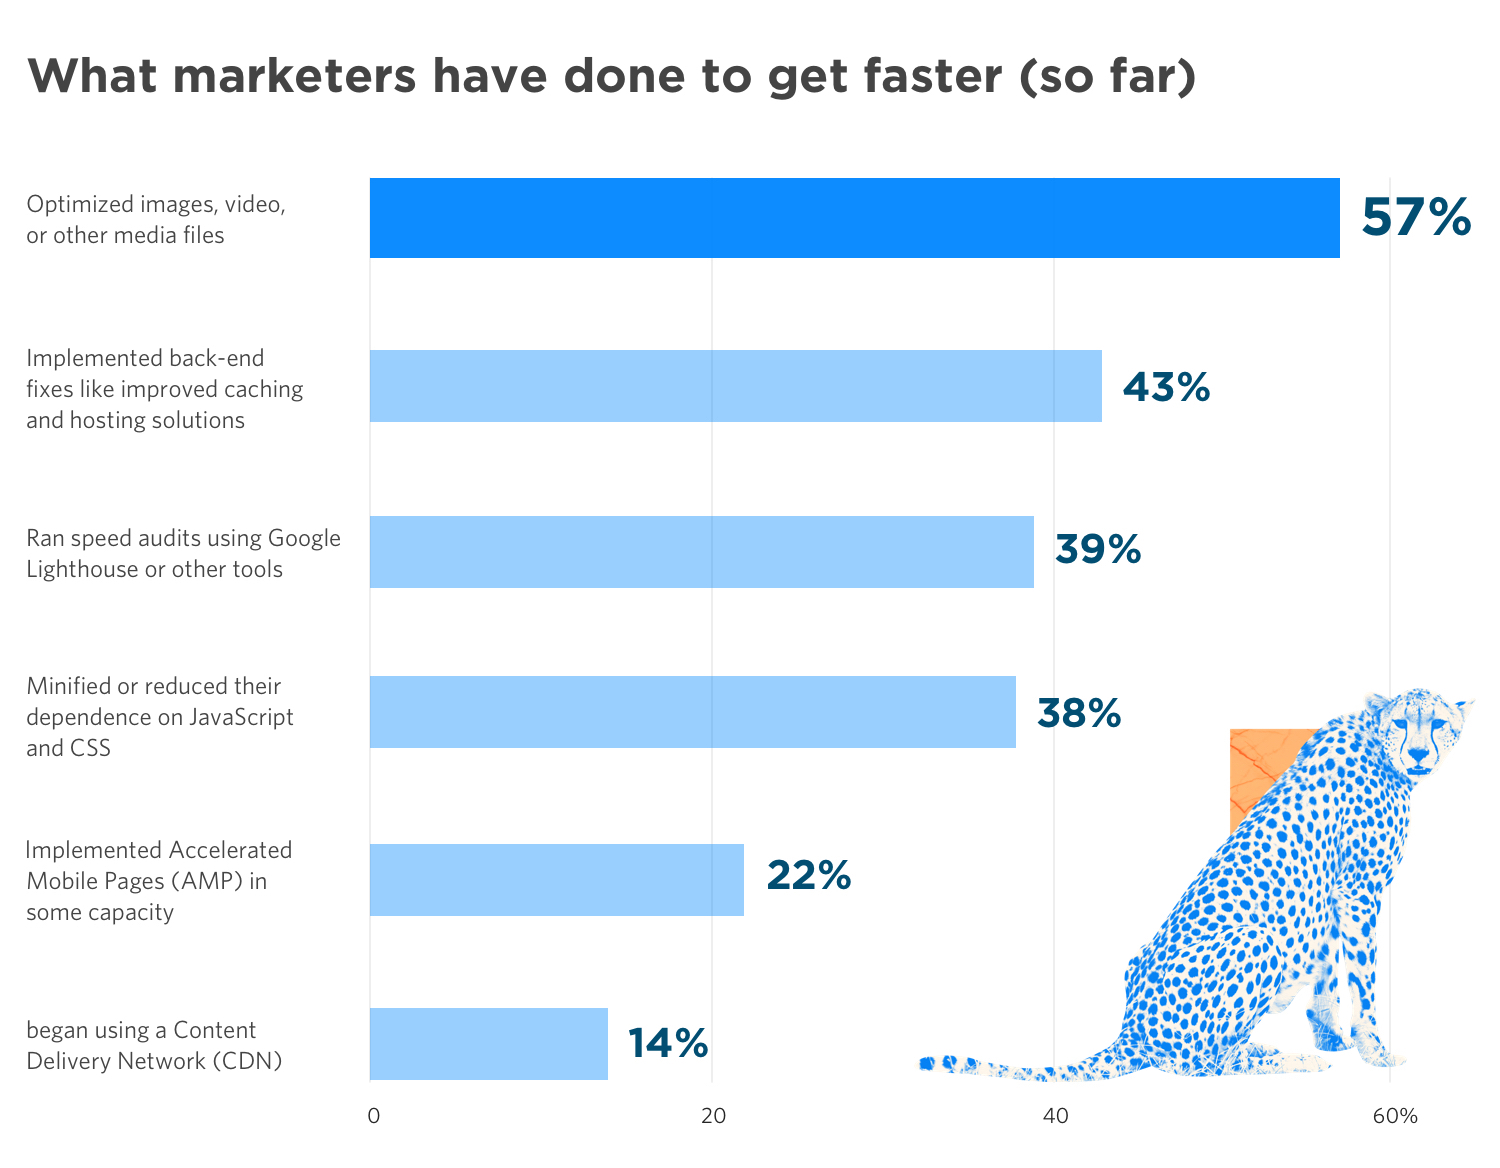
Here, we start to see why marketers are somewhat pessimistic about their page speed progress. Just over half have optimized their landing page images—ostensibly one of the simplest ways to speed up your load times—and even fewer have done any of the real technical-sounding things they need to get faster. (I mean, fair, they sound pretty boring to us, too.)
Here’s a doozy, though: just one in three marketers have run a website speed test to find out whether their load times are impacting their conversions. That’s the easiest one!
And hey, we get it. Marketers are being asked to do more than ever before, often with fewer resources. If you’re a small team (or a single person, the smallest of the teams), you might feel you don’t have the time or expertise to meaningfully improve your page speed.
But I’ve gone and done the hard work for you—me, a film school graduate who, until recently, believed that his Apple computer was impervious to viruses. (Hoo boy, it is not.) I’ve spent hours talking to Unbounce developers, reading how-to guides, and generally just bombarding my brain with the most dull, technical page speed information I could get ahold of. (Apologies to said developers.) And if I can get my head around it, there’s no excuse for the rest of you.
Below, I’ve simplified some of the most effective ways to increase your landing page loading times in a guide. For each fix, I’ve indicated the technical difficulty and the estimated time it’ll take, so you know exactly what you’re getting yourself in to. Use the table of contents below to jump to what’s relevant to you, or go ahead and do it all in order.
Jump to a Landing Page Speed Fix
How to Check Your Landing Page Speed
- Run a Google Speed Test (5 Minutes)
Improve Your Landing Page Speed: Easy Fixes
- Reduce Your Page Content (15 Minutes)
- Optimize Your Images (30 Minutes)
- Host Your Videos Elsewhere (30 Minutes)
- Audit Your Hosting Solution (30 Minutes)
- Implement a CDN (30 Minutes)
Improve Your Landing Page Speed: Intermediate Fixes
- Minify HTML, JS, and CSS (15 Minutes)
- Enable Browser Caching (15 Minutes)
- Set Up GZIP Compression (15 Minutes)
- Kill Needless Scripts and Plugins (30 Minutes)
- Convert Images to Sprites (30 Minutes)
Improve Your Landing Page Speed: Hard Fixes
Ready to boost your page speed?
Final note: If you’ve built your page with Unbounce, you can skip a lot of this stuff—we make many speed fixes on the back-end automatically. In this post, look for the ‘Building Pages in Unbounce?‘ callout boxes to see if a given fix is something you need to implement.
How to Check Your Landing Page Speed
First things first.
Before you throw on your hard hat and start hitting things with a hammer (both figuratively and literally), it’s important to have some idea of what’s working—and what’s not—on your landing page. That means running a speed audit.
It’s important to point out that, regardless of which speed test you use, you don’t want to get too hung up on your score. Achieving a perfect score is not always technically possible (and it might not even be desirable). Instead, use your results as a general guideline to improve page speed and implement the fixes that make sense for you.
Okay—let’s test them pages.
Run a Google Speed Test
Difficulty: Easy / Estimated Time: 5 Minutes
There are a bunch of great tools for testing your page speed, but why not start with the big dog itself? Google’s PageSpeed Insights is an awesome way to do a quick performance check-up with at-a-glance recommendations. (Ryan Engley, Unbounce’s VP of Product Marketing, explains how to interpret and act on your PageSpeed Insights results in this must-read blog post.) Then there’s Lighthouse, a newer tool from Google that provides a comprehensive analysis of your how your page presents to end users.
You’ll also want to run your page through Google’s Test My Site tool, which will check your speed from a mobile perspective.
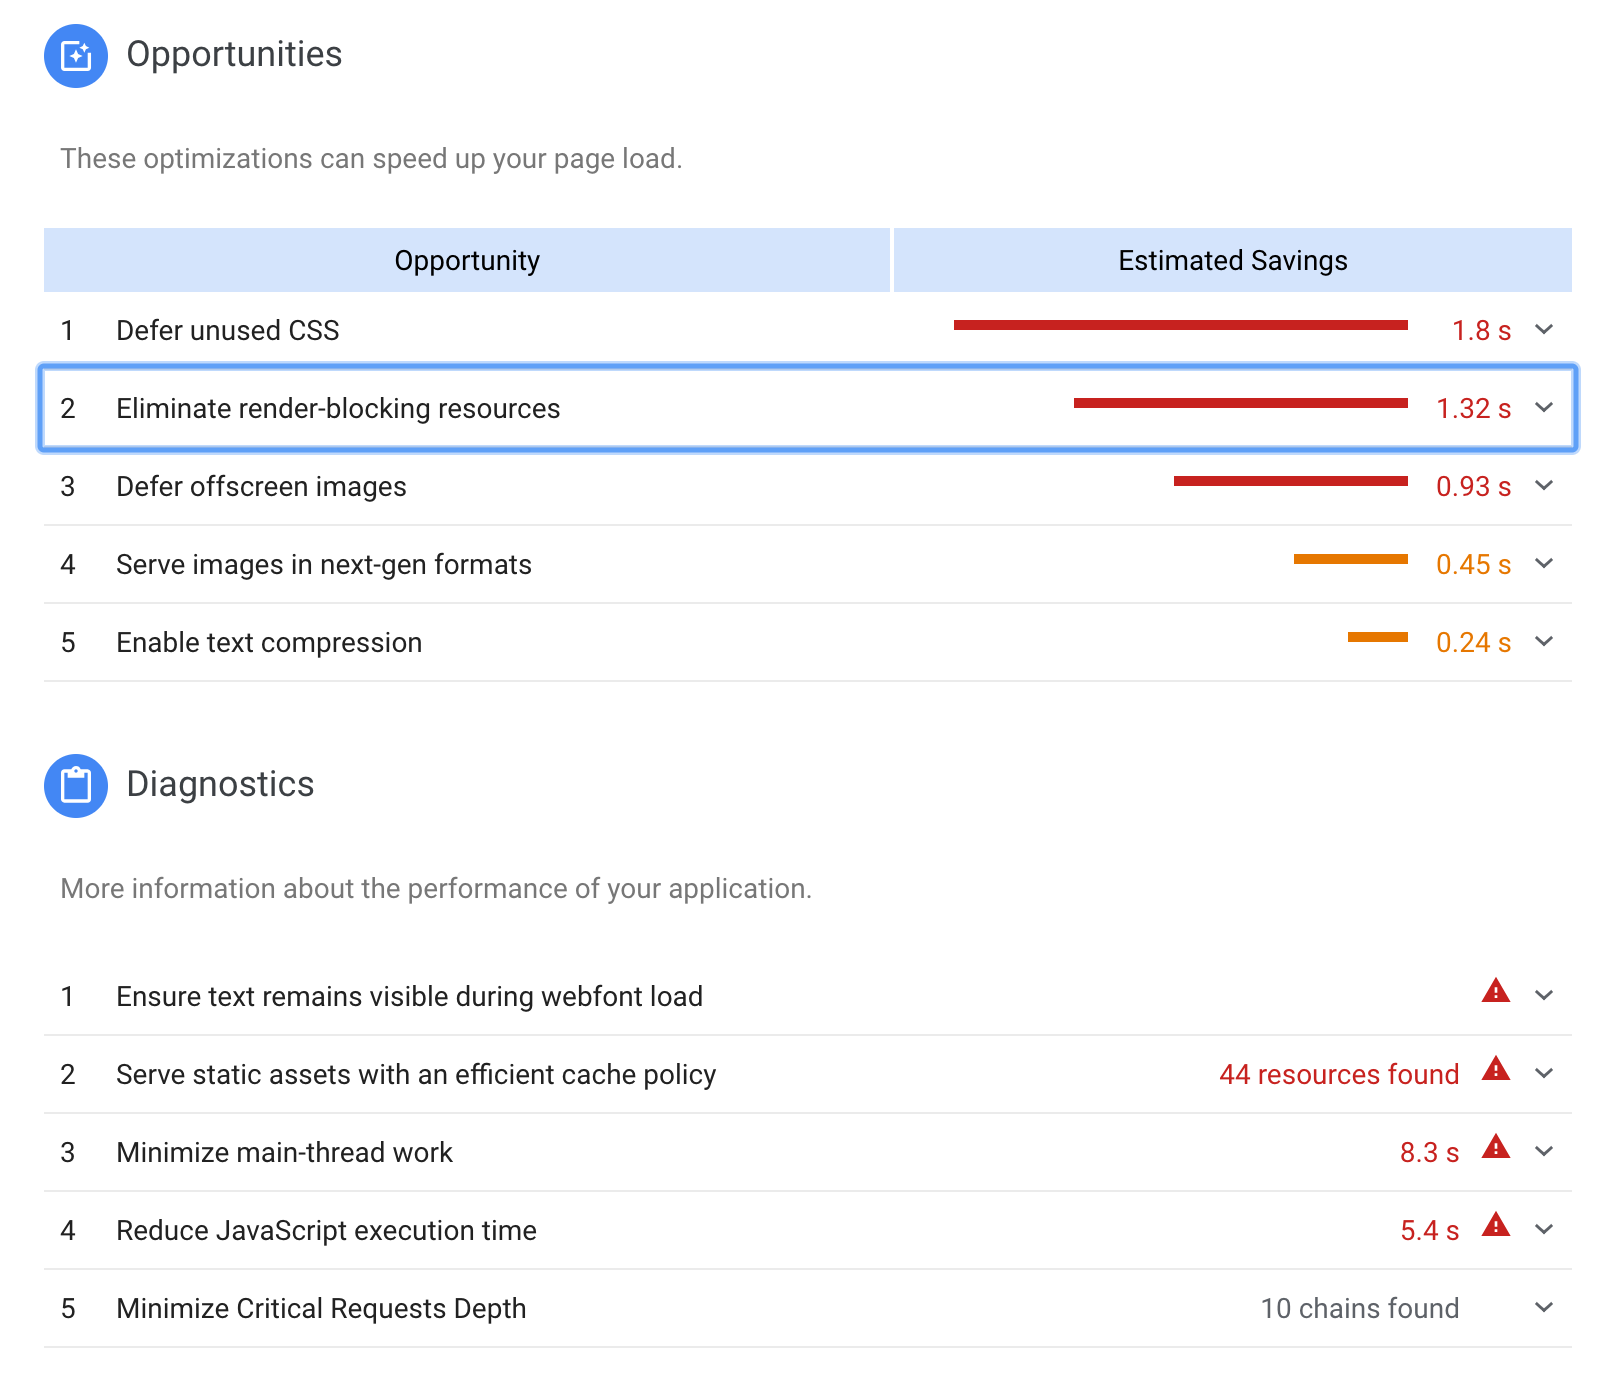
Running a Google speed test should only take a couple of minutes, and the results will help you identify some of the top opportunities to boost your landing page load times.

Improve Your Landing Page Speed: Easy Fixes
With your results from both Google and Unbounce, you’ll be well-equipped to move onto the actual work of making your page perform better. It’s time to pick up that hammer.
These fixes should be simple enough for anyone to tackle, regardless of their technical expertise.
Reduce Your Page Content
Difficulty: Easy / Estimated Time: 15 Minutes
We’ve marked this as an easy opportunity to increase your page speed, but it probably won’t feel like that when you start thinking about which elements on your page you can junk. Marketers love big hero shots, beautiful supporting imagery, and fun, animated explainer videos. But how much of that content is actually helping you drive conversions?
Visual content accounts for a huge portion of the size of an average web page—images account for over 20% of web page weight, as pointed out by Kinsta—and each element creates an HTTP request. That’s when your visitor’s browser pings your web server to request the files that make up the elements of your page. Too many calls can be a serious drag on your load time, so one of the simplest ways to improve your page speed is cutting down the number of elements you include.
Look at each piece of content on your page critically, then ask yourself: “Does this spark joy?” “Does this increase conversions?” If you don’t think there are pieces you can toss, try running an A/B test with a slimmed-down version of the page. The results might surprise you.
Bottom line: stick to the fundamentals of good landing page design and try to keep the number of elements (and thus HTTP requests) to a minimum.
Optimize Your Images
Difficulty: Easy / Estimated Time: 30 Minutes
Once you’ve trimmed some elements from your page, you’ll want to optimize the content that made the cut. Poor image optimization is the most common reason for slow page loads, especially for mobile visitors. Fortunately, it’s also one of the easiest issues to fix.
These are some quick tips for shrinking your images and improving your page speed. The goal here should be getting images at least under 800kb, but the smaller we can make them, the better.
Resize your images
It’s easy to chuck a larger image onto your page and rely on your content management system (CMS) to compress it to the appropriate size, but it’ll still be loading at least some of those extra pixels on the back end, and your visitors are going to feel it in the load. When you add an image, make sure it’s the same dimensions that your page will be rendering it.*
Choose the right file type
Most people don’t think too much about the format of the image they’re uploading, but it can have a dramatic effect on page performance. The file types you’re probably most familiar with are JPEG and PNG—and, yes, there are differences.
JPEG is a ‘lossy’ format, which means it’ll lose some data during compression. That typically gives you a smaller file, but it can come at the expense of visual fidelity. Generally, images with significant color variation (say, photographs) perform better as JPEGs, and any dip in quality can usually go undetected.
PNG is ‘lossless,’ so the image’s appearance won’t change when resized, but it tends to make for larger files if there’s significant color variation. PNG is ideal for simple images with defined shapes, like those with text. Saving PNGs in 8-bit (rather than 24-bit, which has a broader color palette) can help shave off some extra bites.
Here are some optimization tips for JPEG and PNG (and GIF, that villain) from Google itself.
Use compression tools
Before your weigh-in, it’s good to run images through a final round of compression. There are plenty of image compression tools on WordPress, as well as some free, standalone ones like TinyPNG. These shrinky gizmos offer a simple way to cut down your image sizes without braving the cursed labyrinth that is Adobe’s export settings. (Hey, I’m a words guy.)
Your takeaways here are:
- Ensure your image dimensions match how they’ll actually be displayed
- Use JPEG when a slight dip in visual fidelity isn’t the end of the world (like photography), but PNG when it is (images with text and sharp lines)
- Compress images to keep the file size as tiny as possible
If you want to take a deeper dive into image optimization, we recommend that you check out this post from Search Engine Land, which goes into detail on making images smaller while keeping them beautiful.
Host Your Videos Elsewhere
Difficulty: Easy / Estimated Time: 30 Minutes
Why carry something yourself when you can make someone else carry it for you? That’s my motto for landing pages and life, and it’s why I’m no longer welcome on Unbounce’s company hiking trips.
Hosting videos on your own domain can be great for SEO purposes, but that’s not usually our goal with landing pages. We want everything to load in a flash and give our visitors the best chance to convert. Depending on your hosting solution, though, your videos might be slowing down your page speed, suffering from playback issues, and taking up an uncomfortable amount of server space.
Done properly, transferring videos to a third-party platform can shed some extra load time and help your pages render faster. Consider moving video content to Wistia, YouTube, or Vimeo, then using a light embed technique so that your videos only load heavier playback elements when your visitors actually click on them.
Audit Your Hosting Solution
Difficulty: Easy / Estimated Time: 30 Minutes
Loading speed isn’t just determined by what’s on your landing page. Your web host also has a major influence in how quickly your page rolls out to potential customers.
There are three common models for web hosting:
- Shared hosting
Generally the most affordable solution, shared hosting is when your website is hosted alongside other sites on a single web server. Everyone draws from common resources (like storage space and processing power), which means—you guessed it—you need to share. - Virtual private server (VPS) hosting
This is essentially a mix of both shared and dedicated hosting. With VPS, your website still shares server space with others, but you’ll have dedicated resources that no one else can dip into. The result is more power and flexibility, but it tends to come with a higher price tag. - Dedicated hosting
For those who’ve had a traumatic roommate experience (who hasn’t?), dedicated hosting means your website has the server all to itself. More resources, no sharing. That’s great if you’re heavy on digital content and get a ton of traffic, but dedicated hosting is also the most expensive option and requires the technical know-how to set up and maintain your server.
Low-volume websites can generally get by with the cost-effective shared solution, but once your traffic starts to rise, you might not be getting enough juice from your web host to deliver content quickly—and that’s when load times start to suffer. (Give this post from Search Engine Journal a read for a more comprehensive explanation.)
It’s also important to note that the whereabouts of your web server can have a significant impact on your page speed. If you’re not using a content delivery network (CDN; more on this below), you’ll want to make sure that traffic from foreign countries isn’t encountering too much latency.
Think your hosting solution might be impacting your page speed? Run your site through a server speed test like this one from Bitcatcha, and use WebPageTest or Pingdom to see how your quickly your landing page loads in other countries. Depending on the results, you might decide it’s time to upgrade your hosting plan (or change web hosts altogether).
Implement a CDN
Difficulty: Easy / Estimated Time: 30 Minutes
When your landing page gets a visitor, their web browser pings your server to get the content necessary to build out the page. Simple, right? Everyone downloads your website information from the same place, regardless of their location around the world. Well, that’s usually fine if the visitor is in or close to the country that your web server is located, but when they’re halfway around the globe, chances are they’re going to encounter some latency.
To avoid that, you should look into deploying a CDN, which caches your website across a network of data centers and proxy servers all over the planet. Say your own server is in the United States and someone from Lithuania is trying to visit your landing page. Instead of downloading your content from across the Atlantic, that visitor can pull a cached version from a server nearby.
Setting your website up with a CDN is pretty straightforward and—depending on your traffic—generally affordable. Here’s a list of some popular CDN providers from Mashable.

Improve Your Landing Page Speed: Intermediate Fixes
These next speed fixes are a little trickier, but they should be manageable for marketers with a little technical know-how. Still, a mistake here could mean actual damage to your landing page.
Our recommendation? Do some research, make a backup, and—if you can—consult briefly with a developer on your team. It never hurts to have an experienced colleague to turn to if you get in over your head.
Minify HTML, CSS, and JS
Difficulty: Intermediate / Estimated Time: 15 Minutes
All those lines of HTML, CSS, and JS code that make up your landing page? They’re packed with spaces, line breaks, and other bits of formatting that make it more legible and easier for us to interpret, but each makes your load time just an eensy bit slower—and the web browsers your visitors are using to render your page don’t particularly need them.
With minification, the goal is to cut out all of that extra junk and condense your code so that browsers can read it faster. Here’s an example snippet of Javascript code from Wikipedia:
var array = [];
for (var i = 0; i < 20; i++) {
array[i] = i;
}
After minifying, that code would look something like this:
for(var a=[i=0];++i<20;a[i]=i);
There are plenty of free online tools that will do this for your landing page, like Minify Code, as well as a bunch of WordPress plugins. Be sure to check out this post from Elegant Themes, which is an awesome resource that dives into the many options at your disposal.
Enable Browser Caching
Difficulty: Intermediate / Estimated Time: 15 Minutes
The goal with any landing page should be getting prospects to convert the first time they visit, but the reality is that not everyone will. Sometimes, visitors will need some time to think about it: they’ll bounce, do more research, check out some competitors, then come back to your original offer. Browser caching ensures that when they return, your page will load even faster—and that’ll make them more likely to convert.
Not sure if you’ve already got caching enabled? Before you start, run a quick caching check using a tool like this one from GiftOfSpeed.
If your site is built on WordPress, enabling caching is as easy as adding a plugin.* (WordPress is almost too easy, huh?) Check out this list of caching plugins, most of which include quick instructions for getting set up.
*If you’re publishing Unbounce pages to a WordPress domain, these caching recommendations could create big problems. Check with us first.
For those not on WordPress, enabling browser caching on your own is pretty simple if you’re willing to get your hands dirty. For example, on Apache web servers, it comes down to inserting a little bit of code into the .htaccess file on your web host or server:
<IfModule mod_expires.c>
ExpiresActive On
ExpiresByType image/jpg “access 1 year”
ExpiresByType image/jpeg “access 1 year”
ExpiresByType image/gif “access 1 year”
ExpiresByType image/png “access 1 year”
ExpiresByType text/css “access 1 month”
ExpiresByType text/html “access 1 month”
ExpiresByType application/pdf “access 1 month”
ExpiresByType text/x-javascript “access 1 month”
ExpiresByType application/x-shockwave-flash “access 1 month”
ExpiresByType image/x-icon “access 1 year”
ExpiresDefault “access 1 month”
</IfModule>
This article from Varvy provides a great how-to, as does this one from WinningWP (which discusses enabling browser caching from a WordPress perspective but is applicable more broadly).
If all of this makes you nervous, there’s likely a simpler method for you to set up browser caching. Most web hosts will enable caching for you if you ask. Depending on your hosting solution, it might be as easy as making a phone call. (Although, now that I think about it, that might be more daunting for some of us.)
Set Up GZIP Compression
Difficulty: Intermediate / Estimated Time: 15 Minutes
When a visitor reaches your landing page, their browser pings your web server to request the files that make up the page and the server transmits them back. Naturally, that process moves faster if the information being sent is compressed to be as small as possible. Here’s where GZIP compression comes in.
(You’ll want to check to see if GZIP compression is already enabled before you get started.)
As with browser caching, the difficulty of setting up GZIP compression is going to be determined by how your website was built. If you use WordPress, you’re in luck: many WordPress plugins will enable GZIP compression for you almost automatically. If you don’t use WordPress, well, we’re headed back into your server.
This article from GTmetrix provides a quick overview of the importance of GZIP compression and how to enable it. With Apache web servers, you’ll need to add this chunk of code to your .htaccess file.
<IfModule mod_deflate.c>
# Compress HTML, CSS, JavaScript, Text, XML and fonts
AddOutputFilterByType DEFLATE application/javascript
AddOutputFilterByType DEFLATE application/rss+xml
AddOutputFilterByType DEFLATE application/vnd.ms-fontobject
AddOutputFilterByType DEFLATE application/x-font
AddOutputFilterByType DEFLATE application/x-font-opentype
AddOutputFilterByType DEFLATE application/x-font-otf
AddOutputFilterByType DEFLATE application/x-font-truetype
AddOutputFilterByType DEFLATE application/x-font-ttf
AddOutputFilterByType DEFLATE application/x-javascript
AddOutputFilterByType DEFLATE application/xhtml+xml
AddOutputFilterByType DEFLATE application/xml
AddOutputFilterByType DEFLATE font/opentype
AddOutputFilterByType DEFLATE font/otf
AddOutputFilterByType DEFLATE font/ttf
AddOutputFilterByType DEFLATE image/svg+xml
AddOutputFilterByType DEFLATE image/x-icon
AddOutputFilterByType DEFLATE text/css
AddOutputFilterByType DEFLATE text/html
AddOutputFilterByType DEFLATE text/javascript
AddOutputFilterByType DEFLATE text/plain
AddOutputFilterByType DEFLATE text/xml
# Remove browser bugs (only needed for really old browsers)
BrowserMatch ^Mozilla/4 gzip-only-text/html
BrowserMatch ^Mozilla/4\.0[678] no-gzip
BrowserMatch \bMSIE !no-gzip !gzip-only-text/html
Header append Vary User-Agent
</IfModule>
And again, if this is beyond your comfort zone, your web host will probably help you set up GZIP compression if you ask nicely.
Kill Needless Scripts and Plugins
Difficulty: Intermediate / Estimated Time: 30 Minutes
WordPress is wonderful in its simplicity. As we’ve seen throughout this article, page speed fixes that might require a front-end developer on a static website can often be achieved by simply installing a WordPress plugin. Want to enable browser caching? Boom, W3 Total Cache.* Need to minify your scripts? Pow, Autoptomize.* Developer, shmeveloper.
But because it’s so easy to add functionality through plugins, WordPress websites have a habit of collecting a lot of them—along with all the of the bits and bites of code that make them work. Those add up.
Take a look at the scripts and plugins you’ve added to your website and decide whether they’re essential to your visitor experience. If they’re not, junking them could help cut some extra seconds off of your load time. (And guess what? There’s a plugin for that.) You can also disable plugins one at a time, then retest your page speed to determine which ones are problematic.
*If you’re publishing Unbounce pages to a WordPress domain, these plugins in particular might start a fire.
Convert Images to Sprites
Difficulty: Intermediate / Estimated Time: 30 Minutes
If your landing page includes a series of similar-sized images (say, for a client logo bar), you can shorten your load time by combining them into an image sprite, then use CSS to display specific chunks of that sprite at a time. This post from WebFX provides a great step-by-step guide for creating CSS sprites.
Joining smaller images into a larger file might seem counterintuitive, but again, the idea here is to reduce the number of HTTP requests on your page and ultimately make it faster. Each individual image requires its own call—combining images into a single CSS sprite means your page only needs to make one.

Improve Your Landing Page Speed: Hard Fixes
We’re into the scary stuff now.
These are fixes you should absolutely not attempt unless you know what you’re doing or you’ve consulted extensively with a front-end developer. (We even had one of the Unbounce devs fact-check this article, and we’ve never felt smaller.) Proceed with caution.
Remove Render-Blocking JS and CSS
Difficulty: Hard / Estimated Time: 45 Minutes
Those CSS and JS scripts that make your landing page beautiful and enable cool, dynamic functionality? They could be one of the major reasons that your page is loading so slowly. (Bad news for my flashing, neon visitor counter.)
When a web browser runs into CSS or JS in the head of your document, it’ll wait to download and process that content before continuing to render your page’s HTML. That might sound like a good thing from a user experience perspective—after all, we want people to see our landing page as it was intended—but it actually means that visitors can be left waiting on a blank screen while everything loads in the background.
To avoid this, we need to implement techniques for preventing render-blocking CSS and JS on our landing page. (Refer back to your Google PageSpeed Insights results to check if any scripts are slowing down your page load.)

Reduce render-blocking CSS
There are a couple of ways that we can neutralize render-blocking CSS. One option is to defer all CSS until after the HTML has loaded. That’ll certainly improve page speed, but it will also present non-styled content when the visitor first reaches our page. Not ideal.
The other, more preferable option is to defer most style rules until the HTML has been rendered, but inline the CSS necessary to correctly display content above the fold within the HTML. That way, visitors will see the properly-styled content as soon as they hit the page while the rest will load out of view. Pretty sneaky. This is a great tutorial using a real-life example from codeburst.io.
Another page speed opportunity for you here is combining your CSS files. By moving your style rules from several files to just one (or maybe two, tops), you can reduce the number of times that visitors need to ping your web server and improve your landing page load time. Here’s a good resource from GiftOfSpeed on combining and compressing you CSS scripts.
Eliminate render-blocking JS
Like CSS, JS scripts can prevent your landing page from rendering as quickly as you might like. We can avoid that by deploying the defer and async attributes. The former tells the browser to wait until your HTML is rendered before it begins pulling in JS scripts, while the latter asks that JS be downloaded simultaneously without interrupting the HTML download.
An important note is that not all JS scripts are equal: some are critical to the rendering of your page and need to be addressed right out of the gate, so they’ll have to stay at the top. Dareboost does a good job of explaining how to distinguish between critical and non-critical JS, as well as how to implement deferred and asynchronous loading.
Start Hand-Coding with AMP
Difficulty: Very Hard / Estimated Time: ∞ Hours
Alright, “∞ hours” is an overstatement, but implementing AMP is no small task. Developed by Google, the AMP project is an entirely new framework with which to build your web pages. The goal? Dramatically improve page speed, especially for mobile users.
AMP is made up of three core components: AMP HTML, AMP JS, and AMP Cache. That means you’ll need to learn new markup, as well as understand the framework well enough to get your landing pages validated and make sure they actually work.
We won’t get into the nitty-gritty of building with AMP here, but the AMP website has a bunch of resources (including tutorials) to help you get started.
Improving your landing page speed can sound intimidating, but even small tweaks will make a big difference for your load times. Tackle the easy stuff first, then move onto more challenging fixes as you get comfortable. And above all, keep testing: seeing your improved speed results after each undertaking will give you the confidence and motivation to move forward.
Or, you know, just build with Unbounce. We automatically handle most of the speed fixes listed (or at least makes them super easy), which saves a ton of time. That means you can focus on what matters: getting more conversions and improving ROI.
Want to get faster? Here’s some more awesome Unbounce content that speaks to the importance of page speed and provides actionable strategies for how to address it:
- What page speed means for your conversion and bounce rates: 7 Page Speed Stats Every Marketer Should Know
- How page speed became one of the biggest opportunities for marketers: 2019 Is the Year of Page Speed
